
Jumat, 16 Desember 2011
 14.51
14.51
 Tri Admojo

Icon- icon Dan Kegunaan Pada Microsoft word 2003 & 2007
Bagi pengguna Microsoft Word XP atau Office 2003 mungkin sedikit kelabakan jika suatu saat harus menggunakan Office 2007 karena file yang harus dibuka menggunakan format .docx. Mulai mencoba-coba menu-menu yang ada. Mulai dari Home, Insert, Page Layout, References Review ataupun View. Saya sendiri pernah suatu ketika karena mendapat file dari temen dan tugas saya hanya memberi nomor halaman, saya harus pusing tujuh keliling sebelum akhirnya mendapatkan format yang saya inginkan.
Microsoft Office 2007 sebenarnya dirancang untuk memudahkan user, Microsoft Word (MS Word) merupakan program untuk mengolah kata. Program ini bisa digunakan untuk menulis dokumen misalnya karya tulis, skripsi, novel, dan sebagainya. Selain menulis dokumen, MS Word juga dapat digunakan untuk bekerja dengan tabel, menulis teks dengan kreasi, menyisipkan gambar, maupun yang lainnya. Secara default tampilan area kerja program MS Word 2007 terdiri atas dari Bar, Office Button, Quick Access Toolbar, Menu Bar, Ribbon, Ruler, Status Bar, dan View Toolbar. Tampilan area kerja dapat dilihat pada berikut :
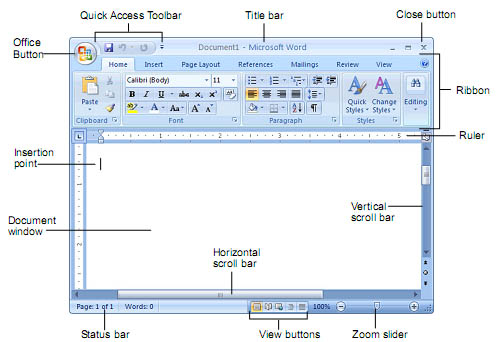
Tampilan Utama Office 2007
Dengan tampilan diatas, tentunya yang kita kenal hanya toolbar formatting. Banyak fitur tambahan yang benar-benar baru.
Title Bar berisi nama file yang sedang dikerjakan, serta tombol menampilkan, atau menyembunyikan jendela program, dan menutup program, yaitu tombol Minimize, Maximize/Restore, dan Close. Office Button berisi perintah-perintah yang berkaitan dengan dokumen seperti membuat dokumen baru (New), membuka dokumen (Open), menyimpan dokumen (Save), mencetak dokumen (Print), dan sebagainya.

Tampilan Baru Ribbon Word 2007
- Quick Access Toolbar berisi tombol-tombol yang berfungsi sebagai alternatif penggunaan perintah yang sering digunakan. Sebagai contoh, tool Open merupakan shortcut dari Office Button>Open, atau tool Save merupakan shortcut dari Office Button>Save.
- Menu Bar berisi serangkaian perintah yang didalamnya terdapat sub-sub perintah sesuai kategorinya. Sebagai contoh, pada menu Home terdapat submenu Clipboard, Font, Paragraph, Styles, dan Editing yang didalamnya berisi perintah-perintah sesuai kategorinya.
- Ribbon berisi perintah-perintah khusus yang merupakan submenu dari Menu Bar.
- Ruler merupakan kotak pengukuran yang diletakkan secara horizontal, yaitu di atas dokumen, dan secara vertikal, yaitu di sebelah kiri dokumen. Ruler berfungsi untuk mempermudah melakukan pengaturan letak halaman.
- Status Bar adalah baris horizontal yang menampilkan informasi jendela dokumen yang sedang ditampilkan, antara lain.
- Page: menampilkan informasi halaman
- Words: Menampilkan jumlah halaman, kata, huruf (tanpa spasi), huruf (dengan spasi), paragraf, dan baris
View Toolbar berisi pengaturan jenis tampilan dokumen, antara lain:
- Print Layout: memberikan tampilan sesuai hasil yang akan diterima pada saat dicetak (default).
- Full Screen Reading: memberikan tampilan halaman penuh.
- Web Layout: memberikan tampilan sesuai hasil yang ditampilkan di dalam jendela browser.
- Outline: memberikan tampilan sesuai heading di dalam dokumen dan tingkatan di dalam struktur dokumen.
- Draft: memberikan tampilan yang berkelanjutan (menggabungkan seluruh halaman seperti dalam satu gulungan). Tiap halaman dipisahkan oleh garis titik-titik.
Dari tampilan yang ada tentunya terbayang betapa harus membutuhkan ketelatenan mencoba dan mencoba, try and error sehingga tampilan baru Word 2007 benar-benar familiar terutama bagi pengguna Word 2003 atau sebelumnya.
Sedikit trik :
Kabar gembira bagi pengguna Office 2003, shortcut yang ada pada Word 2003 dapat difungsikan dalam Word 2007. Bahkan inisial MenuBar dapat difungsikan. Contoh menyimpan dengan menggunakan Alt+F+S atau Ctrl+S
Berikut ShortCut yang ada dalam Word 2003 yang bisa digunakan untuk mempercepat bekerja dengan Word 2007


Jumat, 09 Desember 2011
Cara menghapus atau delete kolom atau baris tabel di ms word 2007
Pada saat membuat data dalam bentuk tabel, terkadang ada kalanya diharuskan menambah tabel atau menambah kolom. Namun selain menambah kolom atau baris malahan kadangkala kita harus menghapus kolom atau baris dalam tabel guna menyesuaikan data yang kita masukkan. Sedangkan cara membuat tabel pada ms word dapat dibuka kembali pada halaman ini.
Cara menghapus kolom atau baris di tabel pada ms word dapat dilakukan dengan cara-cara seperti dibawah ini.
Cara pertama.
- Blok atau seleksi kolom atau baris yang akan dihapus
- Klik kanan pada kolom atau sel tersebut kemudian pilih delete Columns atau delete Rows
- Maka kolom atau baris akan langsung terhapus
Perhatikan ketika anda blok atau menyeleksi baris, seleksi sampai akhir baris bahkan sampai diluar tabel. jika seleksi baris hanya sampai pada sel terakhir dari baris tersebut, maka ketika di klik kanan, maka tidak akan muncul perintah delete rows. Perhatikan gambar dibawah.
Cara kedua
- Klik pada sel dimana baris atau kolom yang akan dihapus
- Klik kanan pada sel tersebut diatas, kemudian pilih delete cells
- Pada Popup yang muncul pilih :
- Delete entire row untuk menghapus baris
- Delete entire column untuk menghapus kolom

- Klik OK
Jumat, 25 November 2011
Tombol Microsoft Office
Lesson 1: Getting Familiar with Microsoft Word 2007 for Windows
Microsoft Word is a word processing software package. You can use it to type letters, reports, and other documents. This tutorial teaches Microsoft Word 2007 basics. Although this tutorial was created for the computer novice, because Microsoft Word 2007 is so different from previous versions of Microsoft Word, even experienced users may find it useful.
This lesson will introduce you to the Word window. You use this window to interact with Word. To begin this lesson, open Microsoft Word 2007. The Microsoft Word window appears and your screen looks similar to the one shown here.
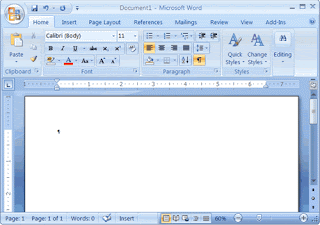
Note: Your screen will probably not look exactly like the screen shown. In Word 2007, how a window displays depends on the size of your window, the size of your monitor, and the resolution to which your monitor is set. Resolution determines how much information your computer monitor can display. If you use a low resolution, less information fits on your screen, but the size of your text and images are larger. If you use a high resolution, more information fits on your screen, but the size of the text and images are smaller. Also, Word 2007, Windows Vista, and Windows XP have settings that allow you to change the color and style of your windows.
The Microsoft Office Button
In the upper-left corner of the Word 2007 window is the Microsoft Office button. When you click the button, a menu appears. You can use the menu to create a new file, open an existing file, save a file, and perform many other tasks.

The Quick Access Toolbar
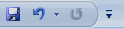
Next to the Microsoft Office button is the Quick Access toolbar. The Quick Access toolbar provides you with access to commands you frequently use. By default Save, Undo, and Redo appear on the Quick Access toolbar. You can use Save to save your file, Undo to rollback an action you have taken, and Redo to reapply an action you have rolled back.
The Title Bar
Next to the Quick Access toolbar is the Title bar. The Title bar displays the title of the document on which you are currently working. Word names the first new document you open Document1. As you open additional new documents, Word names them sequentially. When you save your document, you assign the document a new name.

The Ribbon
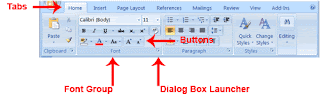
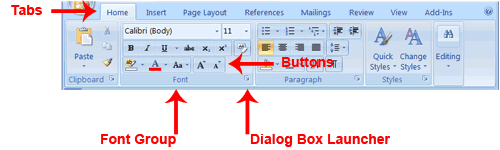
You use commands to tell Microsoft Word what to do. In Microsoft Word 2007, you use the Ribbon to issue commands. The Ribbon is located near the top of the screen, below the Quick Access toolbar. At the top of the Ribbon are several tabs; clicking a tab displays several related command groups. Within each group are related command buttons. You click buttons to issue commands or to access menus and dialog boxes. You may also find a dialog box launcher in the bottom-right corner of a group. Clicking the dialog box launcher gives you access to additional commands via a dialog box.
The Ruler

The ruler is found below the Ribbon.
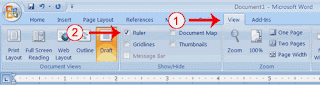
You can use the ruler to change the format of your document quickly. If your ruler is not visible, follow the steps listed here:
Click the View tab to choose it.
Click the check box next to Ruler in the Show/Hide group. The ruler appears below the Ribbon.
The Text Area
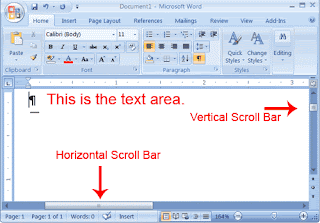
Just below the ruler is a large area called the text area. You type your document in the text area. The blinking vertical line in the upper-left corner of the text area is the cursor. It marks the insertion point. As you type, your text displays at the cursor location. The horizontal line next to the cursor marks the end of the document.
The Vertical and Horizontal and Vertical Scroll Bars
The vertical and horizontal scroll bars enable you to move up, down, and across your window simply by dragging the icon located on the scroll bar. The vertical scroll bar is located along the right side of the screen. The horizontal scroll bar is located just above the status bar. To move up and down your document, click and drag the vertical scroll bar up and down. To move back and forth across your document, click and drag the horizontal scroll bar back and forth. You won't see a horizontal scroll bar if the width of your document fits on your screen.
The Status Bar
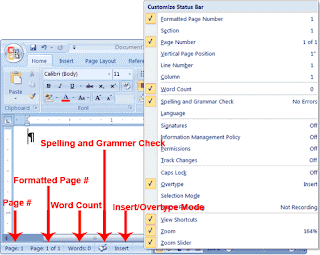
The Status bar appears at the very bottom of your window and provides such information as the current page and the number of words in your document. You can change what displays on the Status bar by right-clicking on the Status bar and selecting the options you want from the Customize Status Bar menu. You click a menu item to select it. You click it again to deselect it. A check mark next to an item means it is selected.
Understanding Document Views
In Word 2007, you can display your document in one of five views: Draft, Web Layout, Print Layout, Full Screen Reading, or Online Layout.
Draft View
Draft view is the most frequently used view. You use Draft view to quickly edit your document.
Web Layout
Web Layout view enables you to see your document as it would appear in a browser such as Internet Explorer.
Print Layout
The Print Layout view shows the document as it will look when it is printed.
Reading Layout
Reading Layout view formats your screen to make reading your document more comfortable.
Outline View
Outline view displays the document in outline form. You can display headings without the text. If you move a heading, the accompanying text moves with it.
You should use Draft view for these lessons. Before moving ahead, make sure you are in Draft view:

Click the View tab.
Click Draft in the Document Views group. When the Draft option is selected it appears in a contrasting color.
Click
During the lessons that follow, you will be asked to "click" items and to choose tabs. When asked to click:
Point to the item.
Press your left mouse button once.
If you are asked to double-click an item:
Point to the item.
Quickly press your left mouse button twice.
If you are asked to right-click:
Point to the item.
Press your right mouse button.
If you are asked to choose a tab, click the tab.
Understanding Nonprinting Characters
Certain characters, called nonprinting caharacters, do not print and will not appear in your printed document but do affect your document layout. You can elect to see these characters on the screen as you type or you can elect to have them remain invisible. For these lessons, opt to see them onscreen. This table describes most of them:
Character Denotes
A tab
.
A space

The end of a paragraph
Hidden text
To view nonprinting characters:
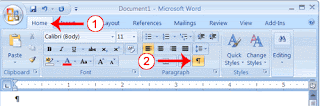
Choose the Home tab.
Click the Show/Hide button in the Paragraph group . The Show/Hide button appears in a contrasting color, when it is selected.
Create Sample Data and Select Text
If you type =rand() in your Word document and then press Enter, Word creates three paragraphs. You can use these paragraphs to practice what you learn. Throughout these lessons, you will be asked to select text. The following exercise teaches you how to create data and how to select data. You can select by using the arrow keys or by clicking and dragging. When using the arrow keys, use the up arrow to move up, the down arrow to move down, the left arrow to move left, and the right arrow to move right. When using the mouse, press the left mouse button and then drag in the direction you want to move.
EXERCISE 1
Create Sample Data
Type =rand().
Press Enter. Three paragraphs appear in your document.
Select with the Shift and Arrow Keys
Place your cursor before the word "On" in the first paragraph.
Press and hold down the Shift key, which serves as an "anchor" showing where text you wish to select begins or ends.
Press the right arrow key until the first line of text is highlighted.
Press the down arrow key until the first paragraph is highlighted.
Click anywhere outside the highlighted area to remove the highlighting.
Select with the Mouse
Place your cursor before the word "You" in the second paragraph.
Press and hold down the left mouse button.
Drag the mouse until you have highlighted the second paragraph.
Click anywhere outside the highlighted area to remove the highlighting.
Place the Cursor
During the lessons, you will often be asked to place the cursor at a specific location (the insertion point) on the screen. You place the cursor by moving the cursor to the specified location and pressing the left mouse button or by using the arrow keys to move to the specified location.
EXERCISE 2
The Arrow Keys
Use the down arrow key to move down your document.
Use the right arrow key to move to the right.
Use the up arrow key to move up.
Use the left arrow key to move to the left.
Cursor
Move around you document by using you mouse and clicking in a variety of location.
Click in a location and type. Note what happens.
Execute Commands with Keyboard Shortcuts
There are many methods you can use to accomplish tasks when using Word. Generally, you choose an option by clicking the option on the Ribbon. However, you can also use shortcut keys. A key name followed by a plus and a letter means to hold down the key while pressing the letter. For example, Ctrl+b means you should hold down the Ctrl key while pressing "b." A shorthand notation of the above would read as follows:
Press Ctrl+b
Typists who are slowed down by using a mouse usually prefer using keys.
Start a New Paragraph
When you type in Microsoft Word, you do not need to press a key to move to a new line. To start a new paragraph, press the Enter key.
Exit Word
You have completed Lesson One. Typically, you save your work before exiting.
EXERCISE 3
Close and Save—Windows Vista
Click the Microsoft Office button. A menu appears.
Click Exit Word, which you can find in the bottom-right corner.
You are prompted: "Do you want to save changes to Document1?" To save your changes, click Yes. Otherwise, click No. If you click Yes, the Save As dialog box appears.
Move to the correct folder.
Name your file by typing Lesson One.doc in the File Name field.
Click Save. Word saves your file.
Close and Save—Windows XP
Click the Microsoft Office button. A menu appears.
Click Exit Word, which is in the bottom-right corner.
You will be prompted: "Do you want to save changes to Document1?" To save your changes, click Yes. Otherwise, click No. If you click Yes, the Save As dialog box appears.
Specify the correct folder in the Save In box.
Name your file by typing Lesson One.doc in the File Name field.
Click Save. Word saves your file.
Microsoft Word is a word processing software package. You can use it to type letters, reports, and other documents. This tutorial teaches Microsoft Word 2007 basics. Although this tutorial was created for the computer novice, because Microsoft Word 2007 is so different from previous versions of Microsoft Word, even experienced users may find it useful.
This lesson will introduce you to the Word window. You use this window to interact with Word. To begin this lesson, open Microsoft Word 2007. The Microsoft Word window appears and your screen looks similar to the one shown here.

Note: Your screen will probably not look exactly like the screen shown. In Word 2007, how a window displays depends on the size of your window, the size of your monitor, and the resolution to which your monitor is set. Resolution determines how much information your computer monitor can display. If you use a low resolution, less information fits on your screen, but the size of your text and images are larger. If you use a high resolution, more information fits on your screen, but the size of the text and images are smaller. Also, Word 2007, Windows Vista, and Windows XP have settings that allow you to change the color and style of your windows.
The Microsoft Office Button
In the upper-left corner of the Word 2007 window is the Microsoft Office button. When you click the button, a menu appears. You can use the menu to create a new file, open an existing file, save a file, and perform many other tasks.

The Quick Access Toolbar
Next to the Microsoft Office button is the Quick Access toolbar. The Quick Access toolbar provides you with access to commands you frequently use. By default Save, Undo, and Redo appear on the Quick Access toolbar. You can use Save to save your file, Undo to rollback an action you have taken, and Redo to reapply an action you have rolled back.

The Title Bar
Next to the Quick Access toolbar is the Title bar. The Title bar displays the title of the document on which you are currently working. Word names the first new document you open Document1. As you open additional new documents, Word names them sequentially. When you save your document, you assign the document a new name.

The Ribbon
You use commands to tell Microsoft Word what to do. In Microsoft Word 2007, you use the Ribbon to issue commands. The Ribbon is located near the top of the screen, below the Quick Access toolbar. At the top of the Ribbon are several tabs; clicking a tab displays several related command groups. Within each group are related command buttons. You click buttons to issue commands or to access menus and dialog boxes. You may also find a dialog box launcher in the bottom-right corner of a group. Clicking the dialog box launcher gives you access to additional commands via a dialog box.
The Ruler

The ruler is found below the Ribbon.

You can use the ruler to change the format of your document quickly. If your ruler is not visible, follow the steps listed here:

Click the View tab to choose it.
Click the check box next to Ruler in the Show/Hide group. The ruler appears below the Ribbon.
The Text Area
Just below the ruler is a large area called the text area. You type your document in the text area. The blinking vertical line in the upper-left corner of the text area is the cursor. It marks the insertion point. As you type, your text displays at the cursor location. The horizontal line next to the cursor marks the end of the document.

The Vertical and Horizontal and Vertical Scroll Bars
The vertical and horizontal scroll bars enable you to move up, down, and across your window simply by dragging the icon located on the scroll bar. The vertical scroll bar is located along the right side of the screen. The horizontal scroll bar is located just above the status bar. To move up and down your document, click and drag the vertical scroll bar up and down. To move back and forth across your document, click and drag the horizontal scroll bar back and forth. You won't see a horizontal scroll bar if the width of your document fits on your screen.
The Status Bar
The Status bar appears at the very bottom of your window and provides such information as the current page and the number of words in your document. You can change what displays on the Status bar by right-clicking on the Status bar and selecting the options you want from the Customize Status Bar menu. You click a menu item to select it. You click it again to deselect it. A check mark next to an item means it is selected.

Understanding Document Views
In Word 2007, you can display your document in one of five views: Draft, Web Layout, Print Layout, Full Screen Reading, or Online Layout.
Draft View
Draft view is the most frequently used view. You use Draft view to quickly edit your document.
Web Layout
Web Layout view enables you to see your document as it would appear in a browser such as Internet Explorer.
Print Layout
The Print Layout view shows the document as it will look when it is printed.
Reading Layout
Reading Layout view formats your screen to make reading your document more comfortable.
Outline View
Outline view displays the document in outline form. You can display headings without the text. If you move a heading, the accompanying text moves with it.
You should use Draft view for these lessons. Before moving ahead, make sure you are in Draft view:

Click the View tab.
Click Draft in the Document Views group. When the Draft option is selected it appears in a contrasting color.
Click
During the lessons that follow, you will be asked to "click" items and to choose tabs. When asked to click:
Point to the item.
Press your left mouse button once.
If you are asked to double-click an item:
Point to the item.
Quickly press your left mouse button twice.
If you are asked to right-click:
Point to the item.
Press your right mouse button.
If you are asked to choose a tab, click the tab.
Understanding Nonprinting Characters
Certain characters, called nonprinting caharacters, do not print and will not appear in your printed document but do affect your document layout. You can elect to see these characters on the screen as you type or you can elect to have them remain invisible. For these lessons, opt to see them onscreen. This table describes most of them:
Character Denotes
A tab
.
A space

The end of a paragraph
Hidden text
To view nonprinting characters:
Choose the Home tab.
Click the Show/Hide button in the Paragraph group . The Show/Hide button appears in a contrasting color, when it is selected.
Create Sample Data and Select Text
If you type =rand() in your Word document and then press Enter, Word creates three paragraphs. You can use these paragraphs to practice what you learn. Throughout these lessons, you will be asked to select text. The following exercise teaches you how to create data and how to select data. You can select by using the arrow keys or by clicking and dragging. When using the arrow keys, use the up arrow to move up, the down arrow to move down, the left arrow to move left, and the right arrow to move right. When using the mouse, press the left mouse button and then drag in the direction you want to move.
EXERCISE 1
Create Sample Data
Type =rand().
Press Enter. Three paragraphs appear in your document.
Select with the Shift and Arrow Keys
Place your cursor before the word "On" in the first paragraph.
Press and hold down the Shift key, which serves as an "anchor" showing where text you wish to select begins or ends.
Press the right arrow key until the first line of text is highlighted.
Press the down arrow key until the first paragraph is highlighted.
Click anywhere outside the highlighted area to remove the highlighting.
Select with the Mouse
Place your cursor before the word "You" in the second paragraph.
Press and hold down the left mouse button.
Drag the mouse until you have highlighted the second paragraph.
Click anywhere outside the highlighted area to remove the highlighting.
Place the Cursor
During the lessons, you will often be asked to place the cursor at a specific location (the insertion point) on the screen. You place the cursor by moving the cursor to the specified location and pressing the left mouse button or by using the arrow keys to move to the specified location.
EXERCISE 2
The Arrow Keys
Use the down arrow key to move down your document.
Use the right arrow key to move to the right.
Use the up arrow key to move up.
Use the left arrow key to move to the left.
Cursor
Move around you document by using you mouse and clicking in a variety of location.
Click in a location and type. Note what happens.
Execute Commands with Keyboard Shortcuts
There are many methods you can use to accomplish tasks when using Word. Generally, you choose an option by clicking the option on the Ribbon. However, you can also use shortcut keys. A key name followed by a plus and a letter means to hold down the key while pressing the letter. For example, Ctrl+b means you should hold down the Ctrl key while pressing "b." A shorthand notation of the above would read as follows:
Press Ctrl+b
Typists who are slowed down by using a mouse usually prefer using keys.
Start a New Paragraph
When you type in Microsoft Word, you do not need to press a key to move to a new line. To start a new paragraph, press the Enter key.
Exit Word
You have completed Lesson One. Typically, you save your work before exiting.
EXERCISE 3
Close and Save—Windows Vista
Click the Microsoft Office button. A menu appears.
Click Exit Word, which you can find in the bottom-right corner.
You are prompted: "Do you want to save changes to Document1?" To save your changes, click Yes. Otherwise, click No. If you click Yes, the Save As dialog box appears.
Move to the correct folder.
Name your file by typing Lesson One.doc in the File Name field.
Click Save. Word saves your file.
Close and Save—Windows XP
Click the Microsoft Office button. A menu appears.
Click Exit Word, which is in the bottom-right corner.
You will be prompted: "Do you want to save changes to Document1?" To save your changes, click Yes. Otherwise, click No. If you click Yes, the Save As dialog box appears.
Specify the correct folder in the Save In box.
Name your file by typing Lesson One.doc in the File Name field.
Click Save. Word saves your file.


